


Creating photo-realistic 3d planets in Photoshop
LightWave 3D

Photoshop

Illustration
[Introduction]
In this tutorial we will create a photo-realistic 3d planet just within Adobe Photoshop. I'll show you that you don't need to use a rendering package to create a nice artistic space scene, Photoshop has more than enough tools to create space settings that look very convincing. I will also explain where in the menus you can find the most important filters, to make it easy on newbies as well! Note - most other decent Paint Aplications (like Photopaint or Paintshop Pro) should be able to reproduce most of the techniques discussed, but you will have to try and find the similar methods there yourself.
Why should we want to use Photshop to create a space scene? Well, first of all, not everybody has access to good rendering packages, nor the knowledge how to use them! You can also make use of many of the techniques discussed when creating other art in Photoshop, or even in creating good planetary imagemaps for your 3d package! I will make heavy use of Photoshops "Cloud" Filter, as it provides a fast and easy way to create detail for our work. We'll leave other uses for the roundup though, now lets get to work!
[Entering Photoshop]
Step 1
Start by creating a new workspace with 1024x768 resolution and a black background color. Of course this will serve as our black space background, but we need some stars, don't we?
There are probably countless ways to create starfields in Photoshop, but I find the following method to produce some of the most beautifull starfields! Create a new layer "starfield" and make your fore-/backgroundcolor white and a very light blue.
Use "Effects-Render-Clouds" and "Effects-Render-Difference Clouds" a few times until you have a nice varied color patern of whites and blues (a fast and easy way to render Difference Clouds many times is hitting ctrl-f after you used the filter once, this will use the last filter again). The reason we are using the cloud filters multiple times, is that we want to create more detailed color patterns, and every time we run difference clouds we add detail to the color pattern! Don't panic if the coulors turn weird when you run difference clouds the first time, just run the filter again, and you will have your original colors back, with loads of additional detail. Don't do too much, our starfield doesn't really need that much of a detailed cloud pattern, just enough to give us some interesting brighter and more dense areas later on.
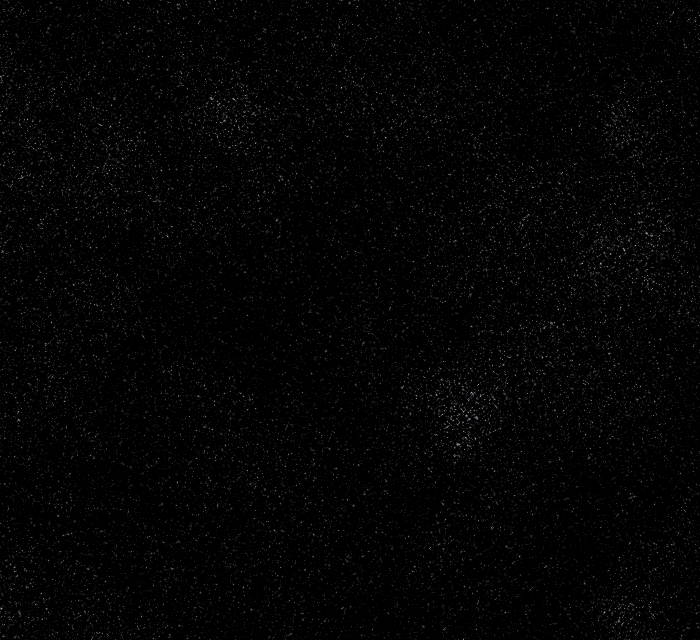 Figure 1 |
Now we'll use the "Effects-Pixelate-Pointillize" filter with a cell size of 3, to break up the noise pattern into pointy fragments that will soon form our starfield. Next we'll use "select-color range" with a fuzziness of 200 to select the main color of the starfield - actually clicking anywhere in the image should work, if it doesn't, try again. Now "clear" the selection twice (or 3 times, up to your taste) by pressing the "Del" key. You can use "Image-Adjust-Levels" to brighten up the starfield, but by now you should have something close to figure 1
Pretty neat! Now that we have created the starfield, we can start with the planet itself!
Step 2
Create a new layer "planet atmosphere". Use the elliptical marquee tool with a feathered edge of 5 pixels to create a new selection, aproximately the size of the planet we want to create (press the shift key to constrain the selection to a circle). Fill it with the light blue color of our starfield and you will have something like in figure 2.
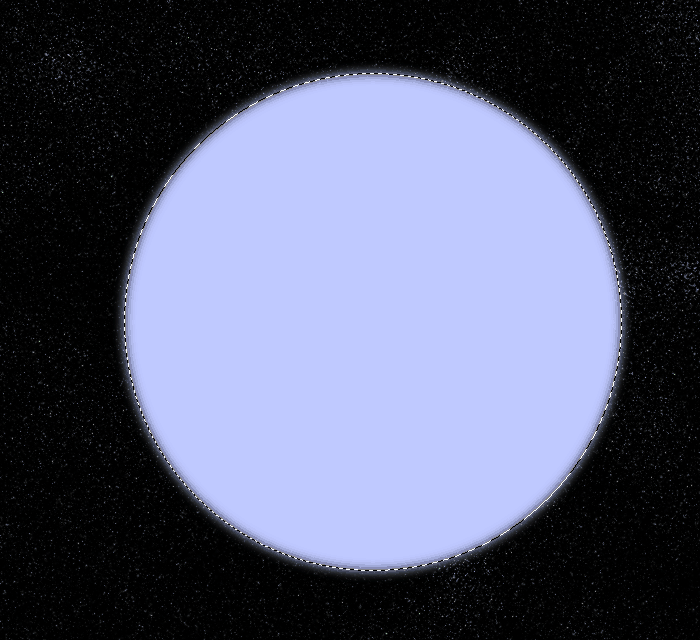 Figure 2 |
Since we will only see the feathered edge of this later on, this will make a nice atmospheric glow! And it has some even more important use for us, it can provide us with a selection of the shape of the planet anytime! I will explain how when we need it.
You can either continue to use this selection by just contracting it by 5 pixels, or you switch to the Magic Wand tool if you want the planet to have a sharper edge. Make sure the Tolerance is not set above 20 and click anywhere within the blue circle to get the shape of our planet without the 5 pixel feathered edge. Just use "select-feather" to give the selection a soft 2 pixel edge.
Our planet is going to be similar to Earth, with oceans and continental mass. Now continental masses are one of the hardest things to come up with as a digital artist, as they tend to be extremely detailed and whenever you try to paint them by hand, they just come out plain awfull and unrealistic. In the next step, I'll show you an easy and fun way to come up with as many detailed continental shapes as you like!
Step 3
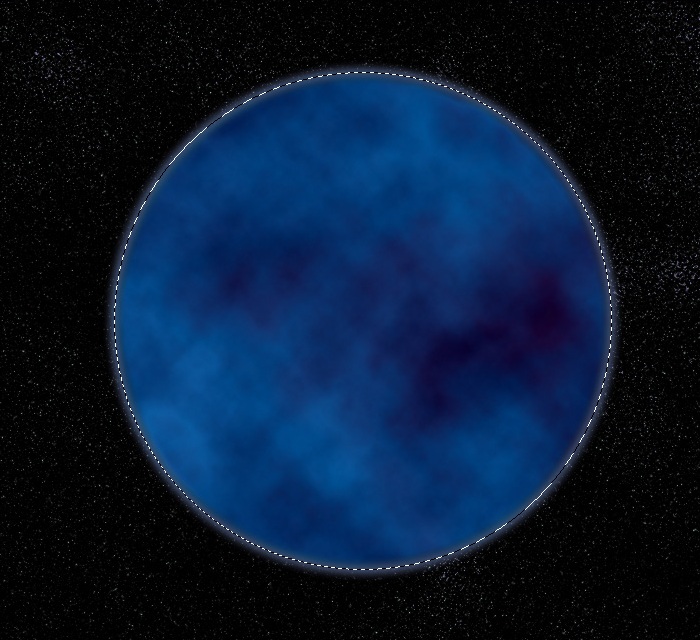 Figure 3 |
Create a new layer "planet water". Make 2 different shades of blue your fore-/backgroundcolors and "Effects-Render-Clouds" and "Effects-Render-Difference Clouds" a few times again to create our ocean.
Create another new layer "planet continents" and repeat the above procedure (I alread switched to the later used shades of brown, but the colors are not yet important). When you have a sufficiently detailed color pattern, make a brief pause, as we will get to one of the most interesting parts of this tutorial! To make work easier you should make the other layers invisible.
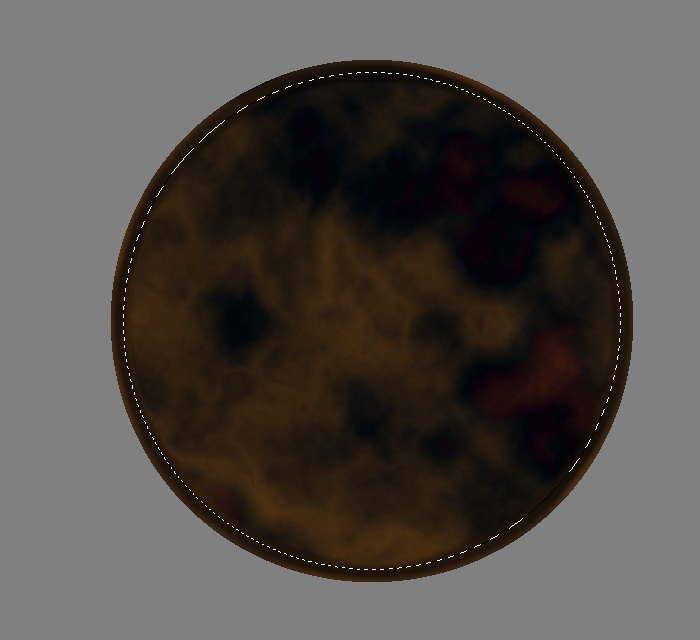 Figure 4 |
We will use a simple but very effective way to transform our noise into detailed landmass for our planet! Let's call it one of "The Lost Tools of Photoshop", but except for brightness/contrast and levels, many of the "Image-Adjust" tools are indeed almost never used by many artists! Our godsent tool is just one of those lost tools though, "Image-Adjust-Threshold"!
Basically this tool will turn our pattern into a 2-color image, but you can select the threshold level of that separation, which is very usefull for our case! Since we have a detailed noise pattern to derive our land from, we will get some very complex shapes, that look amazingly similar to continents and islands! By changing the treshold level, we can choose wether we want to create a large body of land with little water in it, or a planet with lots of island-chains and little landmasses.
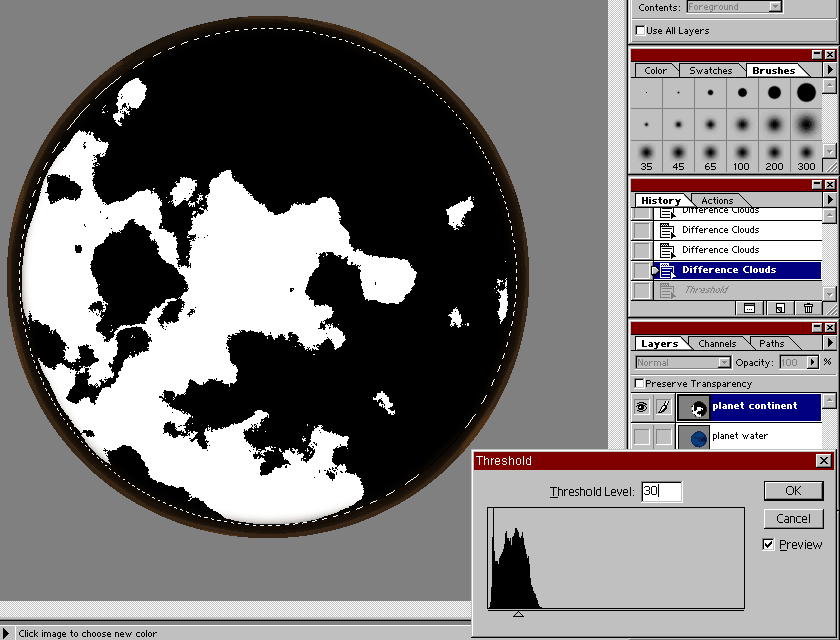 Figure 5 |
Adjust the treshold slider until you are satisfied, the result will be a very convincing looking landmass for our planet, even though its still black and white! Use the Magic Wand tool to selct the white area (our ocean), and clear it (Del). By the way, we don't need to save our selection to a seperate alpha channel, since you can simply load the selection by ctrl-clicking on the layer containing the desired shape. But now lets get to detailing our planet!
Step 4
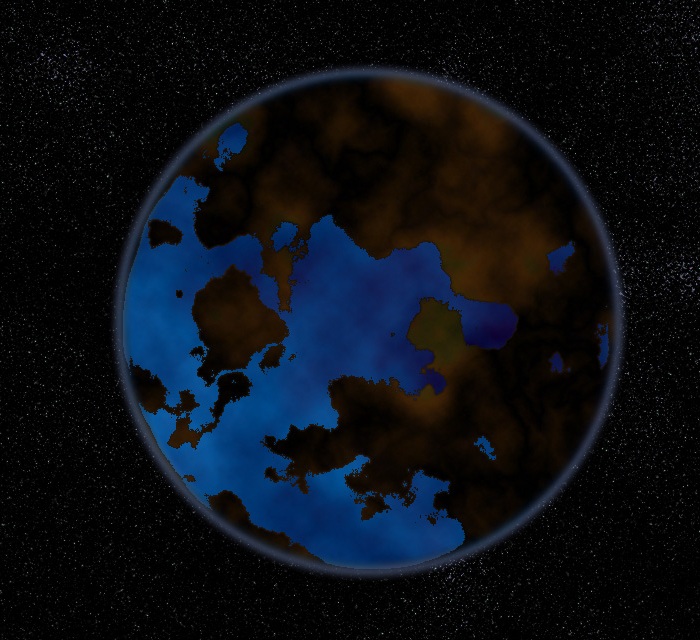 Figure 6 |
Select the remaining landmass by clicking on the "planet continent" layer whilst holding down the ctrl key. If you didn't do so already, now is the time to switch fore-/backroundcolors to different shades of brown! You should now use the "Effects-Render-Clouds" and "Effects-Render-Difference Clouds" method again, to give our planet's land a color pattern and make it look more real. A nice side effect when using Difference Clouds many times is, that some color veins that are created look a lot like mountain ranges and other planetary detail.
When you are satisfied with the resulst for the beginning, clone the layer and name it "planet continent green". You probably guessed it, by repeating our procedure here with different colors, we will create additional detail for the planet! Use shades of green and brown this time.
When you have a nice pattern, invert the selection, expand it by 3 pixels and feather the edge by 4 pixels - then clear! Turn down the layer opacity to about 80% and you should have a nice colored, detailed landmass!
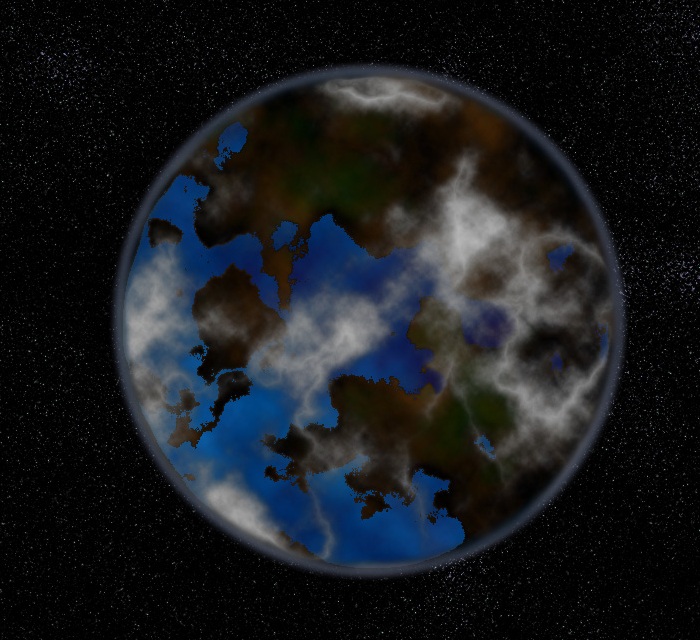 Figure 7 |
Create another layer "planet clouds". Get a selection of the planetary shape by clicking on the "planet atmosphere" layer whilst holding down the ctrl key. Change the fore-/backroundcolors to black and white and use the "Effects-Render-Clouds" and "Effects-Render-Difference Clouds" method to generate the detail of our cloud layer. By using "Select-Color Range" with a high fuzziness value again, this time choosing the black part of the image, we can clear the black parts of the noise, and end up with a cloud layer!
PUH! Time for another short break, we did a lot of detailing already, but we're not yet quite done, our planet lacks it's 3d look!
Step 5
Get a selection of our entire planet (best from the "planet atmosphere" layer). Now we'll use the "Effects-Distort-Spherize" filter to add a spherical distortion to the planet. Either link all layers, or apply the filter to each layer seperately - either way, we end up with an already much more realistic looking planet!
 Figure 8 |
What it lacks now is 3d shading and lighting! Users of 3D packages might think this could become the trickiest part, but it's one of the most simple ones instead. Just create a new layer "shading" and change it's mode to "soft light". The atmosphere-selection should still be active (if not - load it), so just select the gradient tool and fill the selection with a white to black gradient from the left of the planet to the right. There are many ways to make the shading more realistic. You can use a radial gradient, starting a little further off to the left of the planet, to enhance the effect of the planet actually being a sphere; you can enhance the gradient itself, by making the transition area from white to black much smaller and harder, enhancing the effect of the huge mass this planet represents. I leave this up to you.
A further way to enhance the image is to add bumps to the planet, so that it doesn't apear completely flat anymore. We can use "Effects-Render-Lighting Effects" for this, just place a spotlight source to the left of the planet, tweak light intensity a bit, and use any of the color channels as bump source (bottom of the Ligting Effects pop-up window) - in case you're interested, I picked red, because its an important part of the brown of the planet.
 Figure 9 |
You'd best apply this to all layers seperately, since we want to change the bump intensity of each layer. For this you can use the "Effects-Fade Lighting Effects" funktion, which lets you fade the intensity of the effect (the clouds may only require 10%, while the main continent may need 80%). The bumps could cause a little trouble on the "planet continent" layer, and make it appear to "stick out" of the rest of the planet. This is because the layer is empty outside the continental mass and Lighting Effects calculates a strong bump around the edges of the shape.
To prevent this, simply load the shape of the continent as selection (you remember, ctrl-click on the layer) before you render the filter, contract the mask a little and give it a feathered edge. That way the filter won't calculate such a dramatic bump, it's effects are limited to the area of the selection after all!
Step 6
Last but not least, the finishing touch... we'll throw in a nice lensflare from the left!
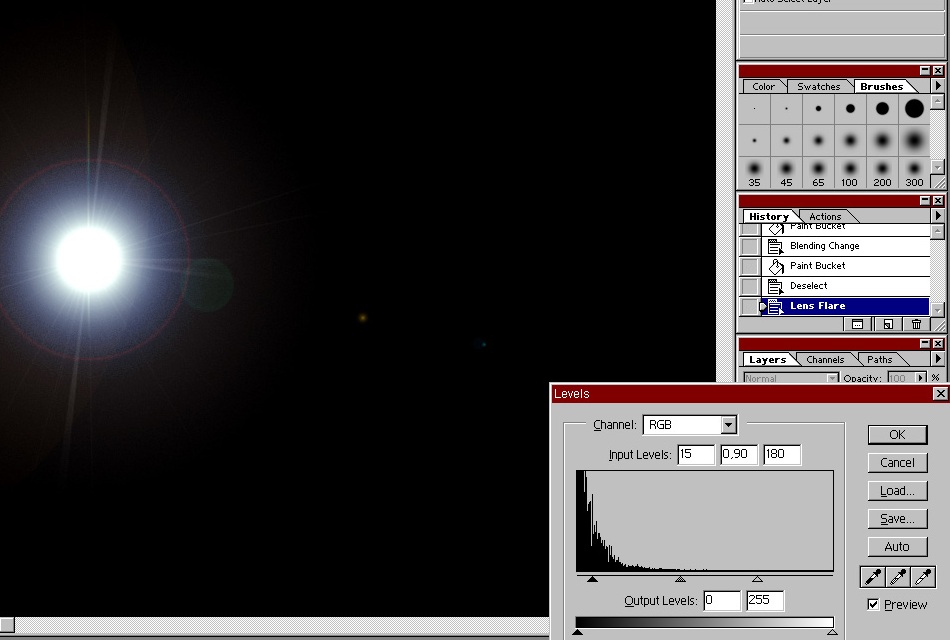 Figure 10 |
Create a new layer "lensflare" and fill it completely with a black background. Now use "Effects-Render-Lensflare" and render a flare of your choice with about 80% intensity. The advantage of rendering this flare seperately, instead of adding it in the final composite is, that we can now adjust the look of the flare as we want, by using "Image-Adjust-Levels" (Figure 10). That way we can enahnce the basic Photoshop flare considerable, creating a nice bright sun! Now only change the mode of the flare layer to "screen", and your flare composites perfectly with the scene!
Congratulations, you made it! Now export this as a JPEG and send me what you created!
[Roundup]
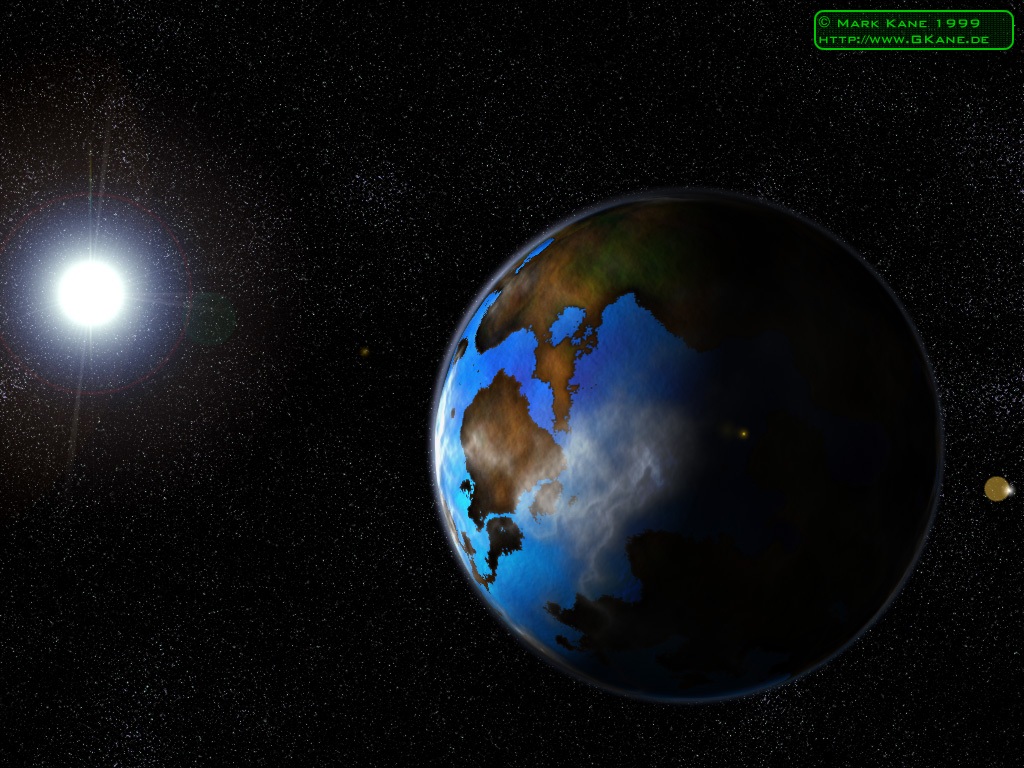 Figure 11 |
Okay folks, I have just showed you how to create a 3d planet entirely within Photoshop. The result should be similar to figure 11. The quality of the planet can easily be enhanced by spending some more time working on it! Using the same basic techniques as in step 4 and modifying the layers with the eraser, you can easily add more realistic geographic features to the landmass (or add more landmass if you like), like desert zones, icecaps or mountain ranges! Don't hesitate to play around with other filters or add features by painting them by hand. I hope you found this tutorial informative and learned some new tricks and aproaches to create your own artwork.
But the purpose of this tutorial was not only to show you a way to re-create the scene, you should try to apply the techniques to other creations as well, and don't think in Photoshop terms alone... e.g. use the "Threshold" trick from Step 3 to create an imagemap of an Earth-like planet for your favourite 3D Package!
Any comments, suggestions and/or questions are welcome!